
Table of Contents
I have long been fond of the concept of Virtual Machines (more commonly known as "VM"-s). The idea that you can "trick" a program into running on a completely different architecture felt fascinating to me even as a child.
In fact, one of my first "bigger" projects was an emulator for the CHIP-8 toy architecture using the ubiquitous Cowgod's Chip-8 Technical Reference v1.0.1 The funny thing is, if I recall correctly, at the time I didn't even really understand the overall logic of how such a machine even works. The tech spec was just so well written, that I was able to implement it with surprisingly little help.
Of course, after receiving an education in computer science, it became far less mysterious to me what I've accomplished and how such emulation is even possible. Alan Turing proved it to us that the native language of a computer is just what it is best at and, with enough time and effort, any sufficiently capable computer can speak any language.
Yet, just because I understand the "how" better these days doesn't mean I hold the concept in any lesser regard, if anything it gave me an even deeper appreciation for the field of computing.
With this in mind, I was very delighted to find a post on Lobste.rs, a coding-themed article aggregation site I frequent, about a coding puzzle that emulates the entire process of "figuring" out a simple architecture and writing a VM for it.
1. A word of warning
It is quite stereotypical to offer such a warning, but I find it important to put one here too:
If the idea of figuring out how to emulate a tiny VM that runs a surprisingly capable Forth system sounds intriguing, please give this a shot on your own before reading on!
I intend to go through my entire implementation of the VM, which will inadvertently spoil much if not all the tricks of the puzzle.
You can access the description for CuneiForth in your browser here. Alternatively, if you happen to
have a client for the Gopher protocol, then you may also directly connect to
gopher://thelambdalab.xyz/1cuneiforth/ instead.
2. Extracting the specification
Our first task is to take the downloaded disk image from the website and process it. Per the instructions, we should find a bitmap, followed by the binary dump of the system.2
The first thing that somewhat tricked me was the following quote (emphasis mine):
The data on this disk is engraved as a series of bits, or zeros (0) and ones (1), in a clockwise spiral, starting from the outer rim, and can be read with an optical microscope.
My immediate assumption was that I'll need to somehow read the bits in a spiral pattern, but thankfully before I wasted too much time I figured out, that this is purely flavour text and the bits are almost (more on why "almost" in a second) in the right order.
2.1. File format
Now that we know this, the task becomes a lot easier, but we still need to decide just what kind of image we'd like to generate. If we wanted to, we could reach for any number of libraries to output JPG or PNG files, but this sort of puzzle is perfect for NetPBM. If you've never heard about it, NetPBM is a specification, that defines a set of primitive picture formats. These require no compression, use super minimalistic headers, and sometimes can be written without any binary data manipulation. These formats were originally invented for resilient transportation over email, but proved to be quite useful for quick and dirty solutions and toy projects. Just like the one we're trying to make here!
The specific format we are going to be using is PBM, which stands for "Portable Bit Map", described by the project's page as:
The PBM format is a lowest common denominator monochrome file format. It serves as the common language of a large family of bitmap image conversion filters. Because the format pays no heed to efficiency, it is simple and general enough that one can easily develop programs to convert to and from just about any other graphics format, or to manipulate the image.
This is not a format that one would normally use to store a file or to transmit it to someone – it's too expensive and not expressive enough for that. It's just an intermediary format. In it's purest use, it lives only in a pipe between two other programs.
Indeed, as we'll soon see, the price we pay for the ease at which this format lets us create our image is that the end result will be positively massive. This is because we are going to use the "Plain PBM" format, which stores pixels as actual ASCII '1' and '0' characters, meaning every single pixel takes up an entire byte.3
2.2. Splitting the data
I will be using Rust for this implementation, but frankly any language that can easily manipulate binary data is a good pick.4
pub fn process_data(data_filename: &str) -> io::Result<()> {
    let pic_exists = std::fs::exists(INSTRUCTIONS_FILENAME).unwrap_or(false);
    let vm_exists = std::fs::exists(SYSTEM_IMAGE_FILENAME).unwrap_or(false);

    if pic_exists && vm_exists {
            println!("[INFO] Both VM and instructions exist.");
            return Ok(());
    }

    let file_exists = std::fs::exists(data_filename).unwrap_or(false);

    if !file_exists {
        eprintln!("[ERROR] File '{data_filename}' doesn't exist! Exiting.");
        return Err(io::Error::new(io::ErrorKind::NotFound, "Data not found"));
    }

    let mut disk = File::open(data_filename)?;
    let mut be_buffer = Vec::new();
    disk.read_to_end(&mut be_buffer)?;

    let (instructions, system) = be_buffer.split_at(BYTES);

    if pic_exists {
        println!("[INFO] Instructions image already exists.");
    } else {
        println!("[INFO] Generating instructions image.");
        write_instructions(instructions)?;
    }

    if vm_exists {
        println!("[INFO] VM image already exists.");
    } else {
        println!("[INFO] Generating VM image.");
        write_system(system)?;
    }

    Ok(())
}
For fun I wrote this section very defensively in the sense that we only do as much work as we need and if the program senses that either the instructions image or the system image already exist, then it won't try to re-create them pointlessly.
The interesting part begins with the (instructons, system) line. The puzzle description told us,
that it is only the first 350208 bits (or 43776 bytes) of data is part of the instructions image, so
we split the buffer there and handle the two parts separately.
2.3. Writing the system data
fn write_system(system: &[u8]) -> io::Result<()> {
    let output = File::create(SYSTEM_IMAGE_FILENAME)?;
    let mut bwriter = BufWriter::new(output);

    bwriter.write_all(&system)?;
    bwriter.flush()
}
For the system data, we just dump it out as is into a separate file. Technically, we could skip this and just always load the entire dataset, then discard the picture data, but I think this makes more sense.
2.4. Writing the image data
Generating the instructions image is a tiny bit more involved, but bear with me.
const PIC_WIDTH: usize = 684;
const PIC_HEIGHT: usize = 512;
const INSTRUCTIONS_FILENAME: &str = "./pic.pbm";

fn write_instructions(be_buffer: &[u8]) -> io::Result<()> {
    let output = File::create(INSTRUCTIONS_FILENAME)?;
    let mut bwriter = BufWriter::new(output);

    writeln!(bwriter, "P1 {PIC_WIDTH} {PIC_HEIGHT}")?;

    for byte in be_buffer.iter().map(|b| !b.reverse_bits()) {
        for i in 0..8 {
            let bit = (byte >> i) & 1;
            write!(bwriter, "{bit}")?;
        }
    }

    bwriter.write_all(b"\n")?;
    bwriter.flush()
}
Creating a Plain PBM image takes the following steps:
- We write the header, starting with the magic string "
P1", which marks this as a Plain PBM image, then the width and height of the picture. - Then we iterate over all the bytes. We pre-process each byte in the following way: First we
reverse the bits (using the aptly named
reverse_bits()function), then we negate the number using!. "Negation" here should be understood as flipping the individual bits to their opposite, so a number like0b1101would become0b0010. The former is done so that we output bytes in the right order and the latter is to make sure the picture is black text on a white background and not vice-versa. - Finally we add a newline character and flush the file output, making sure the whole buffer is written to the disk before we drop the handle.
It's also worth noting that we're using a BufWriter. This is necessary because otherwise we'd be
writing to the disk in a byte-by-byte fashion which is ridiculously slow. This way the BufWriter
keeps track of how much data we've queued for output and writes them to the disk in an optimal way.
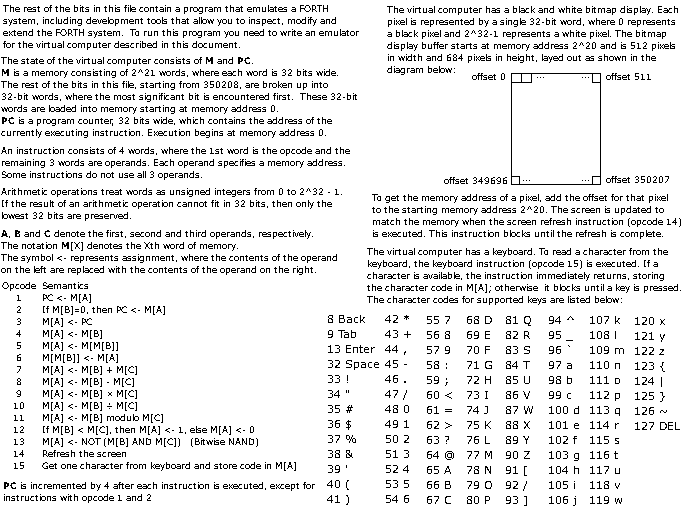
If everything goes well, we have the following picture in our (virtual) hands:
3. Interpreting the bytecode
Now that we have the spec in hand, it's time to interpret it. The VM:
- Uses 32 bit, unsigned words as its base unit. In Rust and Zig this is represented as
u32, in C(++) it'd beuint32_t. - Has RAM, which is 221 words in size. This is
2^21 * 32 / 8 = 8388608bytes or 8192 KiB.5 - Has only one register, named
PC. This stands for "program counter" and it represents the current instruction we are interpreting in the memory. Operates on a big-endian data. This means the VM (or rather the system data we've stored in the previous step) is stored in the opposite order than how we'd expect.
For instance, the number
0x12345678would be stored as0x78 0x56 0x34 0x12in a low-endian system (like x86), while it's stored as0x12 0x34 0x56 0x78in the emulated system. Rust has built in functions to handle data in either format, but we need to be careful or else our interpreter will quickly start doing senseless things.Instructions are four words long, meaning we read and interpret 16 bytes at a time. This is quite similar to how for instance ARM processors work and is actually a huge help, because fixed-length instructions make the decoding phase very simple.
In comparison, x86 for example operates using variable-length instructions, meaning an instruction be can anything from one byte to three and we cannot meaningfully start decoding it until we figure out its length.
- Does not use any trapping mechanism on under-/overflows and instead just wraps around.6
Largely operates only on memory. This is in contrast to Load-Store architectures, where you usually have one or more general registers which you use to load data into, manipulate it in some form, and then write back into memory.
Additionally, other than the "get one character from the keyboard" opcode, the VM is unable to load immediate values into memory and must always read from at least one additional memory cell.
Has a simple monochrome display, which gets its own dedicated part of memory. This is known as a framebuffer.
For CuneiForth, this is a rectangle of 512x684 pixels, where 0 is a black pixel and the maximum value of an unsigned, 32-bit number (
2^32-1, aka0xFFFFFFFF) is a white pixel. This framebuffer is only updated when a specific opcode is called, otherwise it remains unchanged.- Takes in input in the form of a highly restricted subset of ASCII.
3.1. Opcodes
With the base semantics down, it's time to codify the "opcodes" of the VM. These are the basic instructions the machine natively understands. Things like "load this data into this place" or "add these two numbers together". As the spec itself does not give names to these opcodes, I opted to try to come up with relatively obvious and logical names. Still, to make sure we're on the same page, I'll include the semantic meaning above the name of the opcode.
enum OpCode {
    // PC <- M[A]
    // N.B.: We start the numbering of the opcodes from one purely to preserve semantics
    // Due to the way we handle instructions, the actual value isn't super relevant.
    Jump = 1,
    // If M[B] = 0, then PC <- M[A]
    JumpIfZero,
    // M[A] <- PC
    StorePcInA,
    // M[A] <- M[B]
    StoreBInA,
    // M[A] <- M[M[B]]
    StoreBPointerInA,
    // M[M[B]] <- M[A]
    StoreAInBPointer,
    // M[A] <- M[B] + M[C]
    Add,
    // M[A] <- M[B] - M[C]
    Sub,
    // M[A] <- M[B] * M[C]
    Mul,
    // M[A] <- M[B] / M[C]
    Div,
    // M[A] <- M[B] % M[C]
    Mod,
    // M[A] <- If M[B] < M[C] then 1 else 0
    LessThan,
    // M[A] <- ~(M[B] ^ M[C]) (NAND)
    Nand,
    // Refresh the screen
    Refresh,
    // M[A] <- {keyboard input}
    GetChar,
}
Next, we should have a function that recognises the given opcode and returns its given enum
member.7 As not all u32 values constitute valid opcodes, we cannot simply implement the From
trait. Instead, we have to use TryFrom, which is allowed to fail, if the value has no valid
conversion.
To signal such a failure, we use a small error struct, which will contain the problematic value.8
#[derive(Clone, Debug)]
pub struct InvalidOpcodeError(u32);

impl TryFrom<u32> for OpCode {
    type Error = InvalidOpcodeError;

    fn try_from(value: u32) -> Result<Self, Self::Error> {
        if value > 15 || value == 0 {
            return Err(InvalidOpcodeError(value));
        }

        Ok(match value {
            1 => Self::Jump,
            2 => Self::JumpIfZero,
            3 => Self::StorePcInA,
            4 => Self::StoreBInA,
            5 => Self::StoreBPointerInA,
            6 => Self::StoreAInBPointer,
            7 => Self::Add,
            8 => Self::Sub,
            9 => Self::Mul,
            10 => Self::Div,
            11 => Self::Mod,
            12 => Self::LessThan,
            13 => Self::Nand,
            14 => Self::Refresh,
            15 => Self::GetChar,
            // This is safe, because we've already handled all possible other
            // numbers in the if above.
            _ => unreachable!(),
        })
    }
}
3.2. Instructions
Now that we have our opcodes, we can define the struct that will contain instructions. Recall that
the VM operates with 4 word long instructions, where the first word is the opcode and the next three
mark memory locations and are marked A, B, and C.
#[derive(Debug)]
pub struct Instruction {
    pub op: OpCode,
    pub a: usize,
    pub b: usize,
    pub c: usize,
}
You may be wondering why I'm using usize for the addresses, instead of u32 as per the
specification. This is another one of Rust's safety things. Arrays may only be indexed using usize
values, so if we stored u32-s, we'd have to cast them to usize every time we use them. To avoid
this, we simply opt to cast them once and then store the result. Because usize is at least as wide
as u32 on x86 (and even wider on x8664), this is a safe conversion.
3.3. State of the machine
Next I'll define the actual VM itself. This will be a struct, that contains all the state of our machine:
pub struct Machine {
  pub memory: Vec<u32>,
  pub pc: u32,
  pub needs_key: bool,
  pub needs_draw: bool,
}
While the spec only mandates the presence of memory and pc, I opted for two additional boolean
flags, which both signal that execution should be paused until either the screen is redrawn or the
user has entered a key. I'm sure it'd be possible to work purely on what's in the memory, but this
simplifies things nicely.
Also, it might be surprising that I haven't implemented either From or TryFrom for
Instruction. The reason is that I find that instruction extraction is so deeply tied to the VM
itself, that it makes more sense to implement it on the Machine struct itself:
impl Machine {
    pub fn decode_instruction(&self) -> Instruction {
        let base_index: usize = self.pc.try_into().expect("PC out of usize bounds");

        match self.memory[base_index].try_into() {
            Ok(op) => Instruction {
                op,
                a: self.memory[base_index + 1].try_into().unwrap(),
                b: self.memory[base_index + 2].try_into().unwrap(),
                c: self.memory[base_index + 3].try_into().unwrap(),
            },
            Err(InvalidOpcodeError(v)) => {
                panic!("Invalid opcode: {v}");
            }
        }
    }
}
No magic here, we simply convert the current value of PC into an index, take the next four bytes,
and convert it into an Instruction with the necessary casts. I chose to take the lazy way out and
simply crash if the opcode is invalid. You may take a different, more user-friendly path, but that's
beyond the scope of this article.
3.4. Execution
Now comes the beating heart of the VM, the function responsible for running the instruction we toiled so far to extract:
pub fn exec_one(&mut self) {
    let mut should_increase = true;
    let inst = self.decode_instruction();

    match inst.op {
        OpCode::Jump => {
            should_increase = false;
            self.pc = self.memory[inst.a];
        }
        OpCode::JumpIfZero => {
            if self.memory[inst.b] == 0 {
                should_increase = false;
                self.pc = self.memory[inst.a];
            }
        }
        OpCode::StorePcInA => {
            self.memory[inst.a] = self.pc;
        }
        OpCode::StoreBInA => {
            self.memory[inst.a] = self.memory[inst.b];
        }
        OpCode::StoreBPointerInA => {
            self.memory[inst.a] = self.memory[self.memory[inst.b] as usize];
        }
        OpCode::StoreAInBPointer => {
            let addr = self.memory[inst.b] as usize;
            self.memory[addr] = self.memory[inst.a];
        }

        OpCode::Add => {
            self.memory[inst.a] = self.memory[inst.b].wrapping_add(self.memory[inst.c]);
        }
        OpCode::Sub => {
            self.memory[inst.a] = self.memory[inst.b].wrapping_sub(self.memory[inst.c]);
        }
        OpCode::Mul => {
            self.memory[inst.a] = self.memory[inst.b].wrapping_mul(self.memory[inst.c]);
        }
        OpCode::Div => {
            self.memory[inst.a] = self.memory[inst.b].wrapping_div(self.memory[inst.c]);
        }
        OpCode::Mod => {
            self.memory[inst.a] = self.memory[inst.b] % self.memory[inst.c];
        }
        OpCode::LessThan => {
            self.memory[inst.a] = u32::from(self.memory[inst.b] < self.memory[inst.c]);
        }
        OpCode::Nand => {
            self.memory[inst.a] = !(self.memory[inst.b] & self.memory[inst.c]);
        }

        OpCode::Refresh => {
            self.needs_draw = true;
        }
        OpCode::GetChar => {
            should_increase = false;
            self.needs_key = true;
        }
    }

    if should_increase {
        self.pc += 4;
    }
}
Most of this code should be self-evident. Things of note:
- As you can see, all the arithmetic operations use not the usual
+,-,*,/operators, but function calls that implement wrapping. For modulo (%) wrapping is "built-in", so there is no special operator there. should_increaseis used to keep track of the few instructions that don't increase thePC. We use this to stall execution until the user enters a key or if we do a jump to another address.u32::fromallows us to interpret a booleantrueas1u32andfalseas0u32, thus we don't have to write aif/elsebranch for theLessThaninstruction.- Because of ownerships rules,
array[array[index]]is an invalid left-hand side of an assignment. This is why we need theaddrhelper variable, which holds the intermediary index.
3.5. Loading the system image
At this point our VM is pretty much done in terms of implementing the specification, however, it is useless without the means of actually loading the data which we wish to execute.
To that effect, we provide two more functions:
const MEMORY_SIZE: usize = 2usize.pow(21);

pub fn new_from_file(filename: &str) -> std::io::Result<Self> {
    let mut system = Vec::new();
    File::open(filename)?.read_to_end(&mut system)?;

    Ok(Self::new(&system))
}

fn new(raw_memory: &[u8]) -> Self {
    let memory = raw_memory
        .chunks(4)
        .map(|chunk| {
            let array = chunk.try_into().expect("chunk size to be 4");
            u32::from_be_bytes(array)
        })
        .chain(iter::repeat(0u32))
        .take(MEMORY_SIZE)
        .collect();

    Self {
        memory,
        pc: 0,
        needs_key: false,
        needs_draw: false,
    }
}
new_from_file is pretty simple, it just reads the given file and passes it over to new, which
has some more interesting behaviour. As you may know, Rust reads files into a Vec<u8>, however,
our VM operates on u32-s.
Therefore, to convert between the two, we split this vector into chunks of four u8-s (4*8 = 32),
which we then turn into [u8; 4] arrays using try_into and then use these in u32::from_be_bytes
to create u32 values. As you might remember from earlier, the system data is stored in big-endian
format, hence we're using from_be_bytes instead of from_le_bytes.
However, while this does give us an iterator that yields the system's data, the VM's entire
available memory is much longer than the startup code. So to pad things out, we chain an infinitely
repeating list of 0u32 to it and take as many elements as it takes to fill the memory. This is
then collected into a Vec<u32>, which is used in the final struct.
3.6. Getting the framebuffer
I'm jumping forwards a tiny bit, but only to keep relevant code in one place. When we'll get to actually displaying what's visible on the VM's "screen", we'll have to do so by providing the graphics library with a list of bytes.
We could do a similar song and dance as with the loading, but in this case, we can also take an "unsafe" shortcut:
const WIDTH: u32 = 512;
const HEIGHT: u32 = 684;
const SCREEN_START: usize = 2usize.pow(20);
const SCREEN_END: usize = SCREEN_START + (WIDTH * HEIGHT) as usize;

pub fn get_graphics_memory(&self) -> Vec<u8> {
    let (head, body, tail) = unsafe { self.memory[SCREEN_START..SCREEN_END].align_to::<u8>() };

    debug_assert!(
        head.is_empty(),
        "Alignment issue in getting graphics memory."
    );
    debug_assert!(
        tail.is_empty(),
        "Alignment issue in getting graphics memory."
    );

    body.to_vec()
}
align_to takes a slice of one type and converts it to a slice of another type. In our case
&[u32] to &[u8]. As the compiler cannot be certain that the two types have compatible alignment,
it provides not one, but three return values:
bodycontains the properly aligned data. We can be certain that anything in here is valid and well-aligned.headandtailcontain the prefix and suffix of the data, that could not be properly aligned. These remainu32slices.
In our case, since we're converting u32-s which can be cleanly sliced into four u8-s, we expect
head and tail to be empty and enforce this using asserts in debug mode. Finally, we collect the
body into a vector and return it.
4. Driving our VM
Much of what we've implemented so far is fairly specific to CuneiForth. The final step, taking user input and displaying the VM's graphics, requires some code, that's not strictly related to emulation, but is nonetheless necessary.
I was originally going to use rust_minifb as the graphics library, as it provides almost exactly
what we need: A super-simple pixel buffer and a way of getting user input. The reason why I
ultimately gave up on it was because it provides no easy way of getting the ASCII keycode of what
the user enters, instead providing a seemingly-arbitrary list, that doesn't even support Shift+key
sequences.
So instead, I bit the bullet and went for a slightly bigger gun: glium, a safe wrapper around OpenGL, which uses winit as the underlying window-management library. The idea is to take the framebuffer from memory, turn it into an OpenGL 2D texture and draw it on a pair of triangles that form a rectangle the size of the window.
4.1. OpenGL housekeeping
Before the actual interesting stuff, we need to set some very basic stuff up:
const WIDTH: u32 = 512;
const HEIGHT: u32 = 684;

const VERTEX_SHADER_SRC: &str = "
    #version 140

    in vec2 position;
    in vec2 tex_coords;
    out vec2 v_tex_coords;

    void main() {
        v_tex_coords = tex_coords;
        gl_Position = vec4(position, 0.0, 1.0);
    }
";

const FRAGMENT_SHADER_SRC: &str = "
    #version 140

    in vec2 v_tex_coords;
    out vec4 color;

    uniform sampler2D tex;

    void main() {
        color = texture(tex, v_tex_coords) * vec4(1.0, 0.6, 0.0, 1.0) + vec!(0.0, 0.0, 0.0, 1.0);
    }
";

static SHAPE: LazyLock<Vec<Vertex>> = LazyLock::new(|| {
    vec![
        Vertex {
            position: [-1.0, -1.0],
            tex_coords: [0.0, 0.0],
        },
        Vertex {
            position: [1.0, -1.0],
            tex_coords: [1.0, 0.0],
        },
        Vertex {
            position: [1.0, 1.0],
            tex_coords: [1.0, 1.0],
        },
        Vertex {
            position: [1.0, 1.0],
            tex_coords: [1.0, 1.0],
        },
        Vertex {
            position: [-1.0, 1.0],
            tex_coords: [0.0, 1.0],
        },
        Vertex {
            position: [-1.0, -1.0],
            tex_coords: [0.0, 0.0],
        },
    ]
});

#[derive(Copy, Clone)]
struct Vertex {
    position: [f32; 2],
    tex_coords: [f32; 2],
}

implement_vertex!(Vertex, position, tex_coords);
As this is neither a Glium/Winit nor OpenGL tutorial, I'll keep the explanations brief. For additional reading, I recommend this tutorial for Glium textures and the excellent learnopengl.com as a resource for learning OpenGL in general.9
Both our vertex and fragment shaders couldn't be simpler. All the vertex shader does is take in coordinates and pass them through unmodified, while the fragment shader samples the texture (our VM's "screen"), which will be either a completely white or completely black value. This is then mixed with an amber hue. I chose this to imitate the amber-black terminals of old, but it's not a vital part of the presentation. Finally, we add solid black to it, this is necessary to ensure no transparent pixels remain.10
Next is a list of vertices that form two triangles that form a window-sized rectangle. This is our "canvas" on which the texture will be drawn on. It, along with the vertex definition below, are taken verbatim from the Glium tutorial.
4.2. Implementing the event-loop
While Machine contains all the state of our VM, we need yet another container that contains
everything related to our application:
#[derive(Default)]
struct App {
    display: Option<Display<WindowSurface>>,
    window: Option<Window>,
    machine: Option<vm::Machine>,
    program: Option<Program>,
}
I'm not delighted about all the Option<>-s either, but this is simply how Glium expects things to
work. To implement all the graphical logic, we have to implement ApplicationHandler on App. This
is quite a large part of the code, so I'll do it in steps.
First we set up our window and all the associated data:
impl ApplicationHandler for App {
    fn resumed(&mut self, event_loop: &ActiveEventLoop) {
        let (window, display) = glium::backend::glutin::SimpleWindowBuilder::new()
            .with_title("CuneiForth")
            .with_inner_size(WIDTH * 2, HEIGHT * 2)
            .build(event_loop);

        self.window = Some(window);
        self.machine = Some(vm::Machine::new_from_file("./system.img").unwrap());
        self.program = Some(
            Program::from_source(&display, VERTEX_SHADER_SRC, FRAGMENT_SHADER_SRC, None).unwrap(),
        );
        self.display = Some(display);
    }
We create the window, load the Forth system data, compile the two shaders into an OpenGL program, and store the handle to our display.
Next comes the actual event loop, which handles everything from the window being closed, to user input, to the OS (or us) requesting a redraw of the screen. We'll take these one by one:
fn window_event(&mut self, event_loop: &ActiveEventLoop, _id: WindowId, event: WindowEvent) {
    let machine = self.machine.as_mut().unwrap();
    while !(machine.needs_draw || machine.needs_key) {
        machine.exec_one();
    }

    let indices = glium::index::NoIndices(glium::index::PrimitiveType::TrianglesList);
    let vertex_buffer =
        glium::VertexBuffer::new(self.display.as_ref().unwrap(), &SHAPE).unwrap();

    match event {
        WindowEvent::CloseRequested => {
            println!("The close button was pressed; stopping");
            event_loop.exit();
        }
First we run the VM until there is an event that requires our attention. This isn't the most elegant
solution, I admit, but for an application this simple, it's plenty enough. Once that happens, we set
some additional stuff up for OpenGL drawing (more or less that we wish to draw triangles and that we
want to use the previously created display to draw the triangles declared in SHAPE).
The first event we handle is when the user pressed the close button. We have nothing to manually clean up, so we just ask the application to close itself.
WindowEvent::KeyboardInput {
    device_id: _,
    event,
    is_synthetic: _,
} => {
    if event.repeat || event.state == ElementState::Released {
        return;
    }

    if !machine.needs_key {
        return;
    }

    if let Some(chr) = event.logical_key.to_text()
        && let Some(first_char) = chr.as_bytes().first()
    {
        let inst = machine.decode_instruction();

        machine.memory[inst.a] = (*first_char).into();
        machine.needs_key = false;
        machine.pc += 4;
    }
}
We don't allow holding down keys (which I found to cause annoying double presses) and we also aren't interested in key released events, only key presses. We also only want to store key presses if the machine actually requested input.
Finally, if we have a key, we convert it into a slice of u8-s and take the first one. This is then
written into the VM's memory, the PC is incremented and we clear the needs_key flag.
  WindowEvent::RedrawRequested => {
      if machine.needs_draw {
          machine.needs_draw = false;

          let mut target = self.display.clone().unwrap().draw();
          target.clear_color(0.0, 0.0, 0.0, 1.0);

          let raw_image: RawImage2d<u8> = RawImage2d::from_raw_rgba_reversed(
              &machine.get_graphics_memory(),
              (WIDTH, HEIGHT),
          );

          let texture =
              Texture2d::new(self.display.as_ref().unwrap(), raw_image).unwrap();
          let uniforms = uniform! {
              tex: glium::uniforms::Sampler::new(&texture).magnify_filter(glium::uniforms::MagnifySamplerFilter::Nearest)
          };

          target
              .draw(
                  &vertex_buffer,
                  indices,
                  self.program.as_ref().unwrap(),
                  &uniforms,
                  &DrawParameters::default(),
              )
              .unwrap();
          target.finish().unwrap();
      }

      self.window.as_ref().unwrap().request_redraw();
  }
_ => (),

// This closes the match, fn and impl blocks vvv
        }
    }
}
This is the longest event handler. As you can see, the whole update spiel is behind an if. We only
call all this code if the VM actually requests a redraw. Otherwise, we simply pass the current state
to the window.
If we do need to redraw things, we request a target, this is just a handle that allows things to
be drawn on it. Then we create a texture containing the VM's screen data interpreted as u8 quartets (see
my comments about get_graphics_memory() in the earlier section).
After that we set our sampler's filtering function to nearest-neighbour. Since we're drawing pixel data, any sort of interpolation or mixing will only make our graphics blurry. Nearest-neighbour ensures we have crisp pixels.
Next we finally pass everything we toiled so far to the unceremoniously named draw function and
we're done. Everything snaps into place and the result of our emulation is displayed on our screen.
(And we also discard any other events, without doing anything with them.)
4.3. Main function
fn main() -> io::Result<()> {
    let data_filename = std::env::args()
        .nth(1)
        .unwrap_or_else(|| String::from("./disk.img"));

    extract::process_data(&data_filename)?;

    let event_loop = EventLoop::new().unwrap();
    event_loop.set_control_flow(ControlFlow::Wait);

    let mut app = App::default();

    println!("[INFO] Starting event loop.");
    event_loop.run_app(&mut app).unwrap();

    Ok(())
}
We take in the raw data's filename from the command line arguments (or default to "disk.img"), extract stuff we don't already have, then kick-start the event loop, which runs until we're done.
5. Conclusion
If we start the app, we're greeted with the following sight:
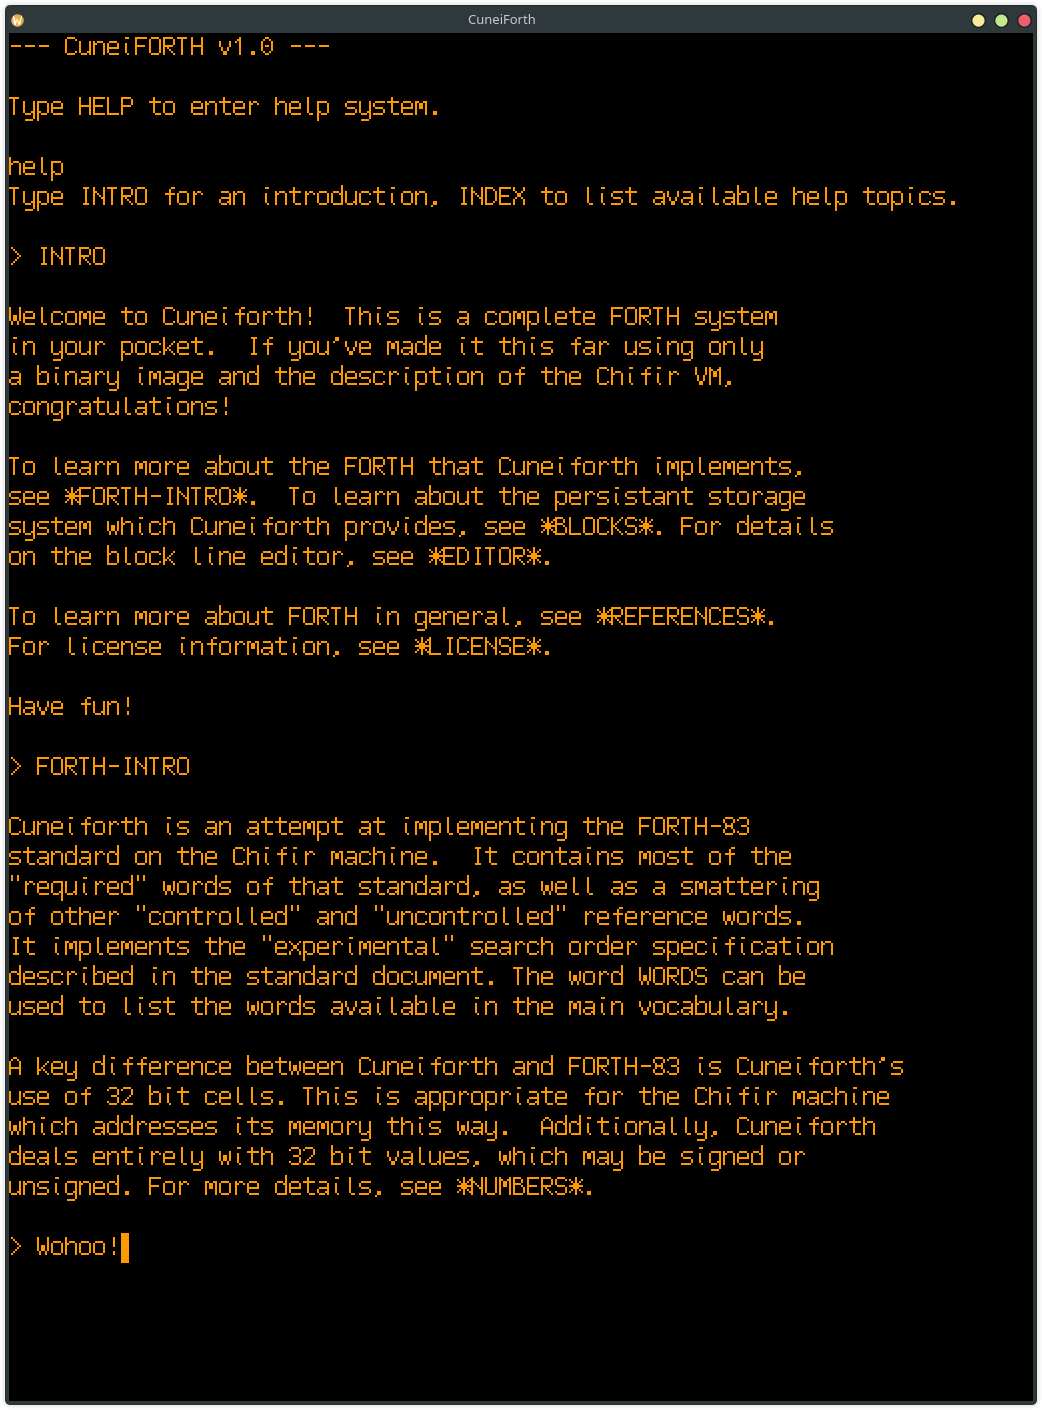
Figure 1: I entered some basic commands to show off that the program really does function.
Thank you for reading this far. If you'd like to see the whole code, please see this repo hosted on Codeberg.
Till next time!
Footnotes:
I know, I know, Github nowadays is quite frowned upon, but if you look at the repo's age (which I'm pretty sure is still much newer than when I actually wrote the code) I hope you'll understand.
By the way, the system that we're emulating is named Chifir and the program running on it is CuneiForth. I chose to always refer to it as CuneiForth to keep things simple.
This was the method I used in my original implementation, however, it kept bugging me just how inefficient it was and how binary / normal PBM could slice the required storage space into an eight of the plain version.
This sent me on a wild goose chase and after several hours of banging my head against a wall, I was finally able to implement a more complex algorithm that was capable of keeping track of the amount of bits written and the padding necessary to write a proper binary PBM image.
I was considering to include this algorithm into the post instead of the simpler, plain version, but I figured it's a lot of complexity for something that's ultimately only tangentially related to CuneiForth and VMs in general, so I stuck with the pragmatic option.
Yeah… I was initially thinking of using Lua (more specifically Fennel), but I soon found that while both are excellent languages, they are a lot more suited towards higher-level programming. Calling out into LuaJIT functions very quickly proved to be a pain and, while I did manage to write a tiny disassembler of sorts, I ultimately gave up on this idea and went on to use Zig. I finished an emulator using it, but struggled to tie it to a graphical library, so I finally caved and went with Rust.
That's kibibyte, not kilobyte. The difference is that one kilobyte is (as the name implies) 1000 bytes, while one kibibyte is 1024 bytes.
This too caused quite a bit of headache to me, while I was working on the emulator. The emulator booted and in the memory dump I was seeing code being executed, but the VM kept spinning in an infinite loop and I couldn't for the life of me figure out why… until I realized I was actually using saturating operations, which (instead of wrapping around) clamp their results to the extremities of the data type.
For example if we take 254 as an eight-bit, unsigned number and add 2 to it, then with wrapping addition, we first reach 255 (which is the maximum representable number using 8 bits) and then wrap around to 0. With saturating arithmetic, however, we simply "max out" at 255 and stay there.
In a less strict language, you can get away with a cast. Say, in C you could just do
(OpCode)memory[PC] and it'd work. However, since we're using Rust, we need to be a bit more
verbose for the same effect.
Alternatively, we could also use a crate like enum_primitive, which automates this process, but I
wanted to use as few crates as possible for educational purposes.
In truth, unless we royally messed up, this conversion will never-ever fail. We could just
whip out some unsafe code and YOLO things and we'd be most likely fine. Still, this makes our
intent clearer and it's best not to use unsafe unless necessary.
In general you'd do good to rely on these instead of my code… While my implementation works and is reasonably fast, I haven't really used OpenGL much in my life and I'm certain my code is hardly idiomatic. I have little to no intuition about what needs to be cached, what's safe and quick to recreate every loop, and I haven't bothered to benchmark.
I experienced that without this it rendered just fine on Arch Linux, but had horrific visual artifacts on Fedora.